Sunday, June 25, 2006

Sunday Sweets Blogging: Sour Cherry Crumb Tart


Cranberries, rhubarb, and now sour cherries. Do we sense a theme here? I appear to have a thing for incandescently red, tart fruit, don't I? I suppose I might as well confess that I love pomegranates and blood oranges, too. I'm sure someone with a psychology background could come up with some sordid reason for my attraction to crimson fruits, but I prefer not to examine the implications too closely and just enjoy the mood-lifting color and the tastebud-stimulating tingle.

Even if you don't share my potentially problematic compulsion to snatch up anything red and tangy, you really ought to take advantage of the blink-of-an-eye season for sour cherries if you're lucky enough to live in their growing area. They're obscenely expensive for the two weeks or so that they appear, and pitting them is a pain in the ass, but their manic color and flavor are so wonderful that it's well worth the pricetag and the trouble. If you do bite the bullet, the best way to showcase them is in a pie, or, if you're not feeling up to working with dough, a crisp or cobbler. You want to let the fruit get top billing, with some plain and sweet dough or crumbly mixture to play the supporting role.

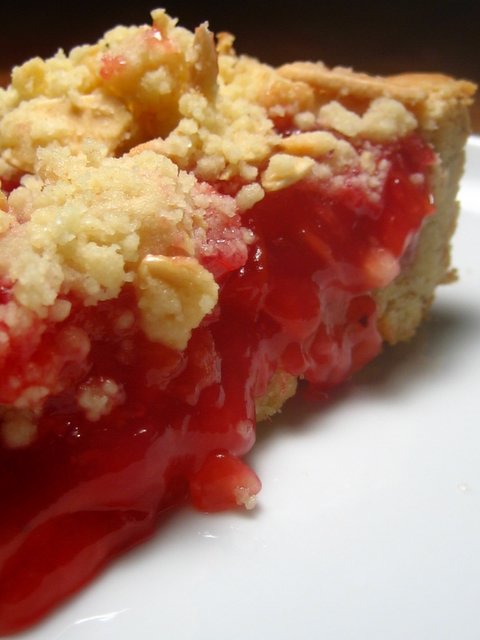
I went a little nuts (literally!) with today's recipe, which combines both an almond-enhanced bottom crust and a crumbly topping, but since they're a once-a-year treat, I thought they deserved the extra effort. As has become another habit, this recipe is an amalgam of components from several recipes: the basic almond tart dough and the almond crumble from Nick Malgieri's How to Bake, and the filling from a Gourmet recipe for sour cherry crostata on Epicurious. The end product is humble in appearance but a shooting star in taste and texture, with a tender cookie-like crust and a crumbly and nutty top layer, sandwiching between them a zingy layer of unadorned fruit.

Sour Cherry Crumb Tart
Makes 1 9-inch tart

Almond Tart Dough

1 stick (8 tablespoons) unsalted butter, at room temperature
1/4 cup sugar
1 teaspoon vanilla extract
1 egg yolk, at room temperature
1/2 cup finely ground almond meal
1 1/4 cups all-purpose flour

Sour Cherry Filling
3 tablespoons unsalted butter
1 quart fresh sour cherries, pitted (approx. 4-5 cups)
3/4 cup sugar
3 tablespoons cold water
3 tablespoons cornstarch

Almond Crumble Topping
1 cup all-purpose flour
3 tablespoons sugar
1/4 teaspoon nutmeg
1/2 cup slivered almonds
6 tablespoons butter, melted

Equipment: 9-inch fluted tart pan with a removable bottom

Combine the butter and sugar in the bowl of an electric mixer and beat on medium for 5 minutes, or until fluffy and pale in color. Beat in the vanilla and egg yolk and beat for another 2 minutes, then beat in the almond meal. Sift the flour over the the mixture and fold in gently with a spatula, until no traces of flour remain. Place in a gallon-sized zip-top bag or sandwich between two layers of plastic wrap and press out into a disk approx. 1/4 inch thick. Refrigerate until ready to use.

Melt the butter in a large nonstick skillet over moderate heat, then add the cherries and sugar, stirring until the sugar has dissolved. Lower the heat and continue to simmer until the cherries are tender but not mushy, about 6 minutes. Mix the water and cornstarch into a paste, pull the pan off the heat, and stir the paste into the filling. Return the pan to the heat and simmer two more minutes, stirring frequently. Pour the filling onto a shallow baking dish and allow to cool to room temperature.

Place the oven rack in the lower third of the oven and preheat the oven to 350F. While the oven is heating, prepare the topping by mixing the dry ingredients in a medium bowl, then stirring in the butter until thoroughly combined. Let sit for five minutes, then break the mixture into medium-sized crumbs with your fingers.

Remove the dough from the refrigerator and press into the tart pan, making sure the bottom and sides are even and patching any cracks or holes through which the filling might ooze. If the dough heats and softens too much from working it, return to the refrigerator for several minutes, then fill with the cherries. Sprinkle the topping evenly over the top.

Set the tart on a parchment-lined cookie sheet and bake until the dough and topping are golden and the filling is bubbling, 30-40 minutes. Remove from the oven and let cool completely on a rack, a full hour if you can wait that long, and at least half an hour if you can't.

Saturday, June 24, 2006

Naked Pizza


After half a lifetime spent piling as much onto a pizza as the laws of physics will permit, I have finally come to the conclusion that the Italians have it right after all, and that the ridiculous excess of American pizza is really an insult to the basic form. Pizza, in order to be any good at all, needs to be as minimalist as possible, so that you can taste the mellow yeastiness of the crust, the peppery fruitiness of the oil, the mineral tang of the salt, and the individual characteristics of the very few and elemental toppings you do choose to add. Tons of cheese only dull your palate, sweet and pasty tomato sauces only make the whole experience insipid, and too many toppings not only clash and drown each other out, but also weigh down and wet the dough so much that you will never get a properly crisp crust.

There are therefore two secrets to really spectacular and satisfying pizza: Keep It Simple, Stupid, and do not even bother if you're not going to use a baking stone. I know it seems like the height of yuppified self-indulgence to buy a baking stone, but you absolutely need the porous ceramic texture to wick away the extra moisture and sear the crust to a crackly, caramelized golden-brown. A mediocre batch of dough can be saved by baking on a ripping-hot stone, but even the most perfectly kneaded and risen dough will become a spongy, disappointing mess if you bake it on a regular cookie sheet. There's no point in going to all the trouble (and potential heartache) of working with yeast if you're going to handicap yourself from the start, so you really owe it to yourself to spring the $20 at Williams Sonoma or Bloodbath and Beyond, or even the $3 at Home Despot for unglazed quarry tiles instead (Thanks, Alton Brown!) .

As you can see above, dinner tonight featured my absolute favorite pizza: a white pizza with nothing but olive oil, salt, and thinly sliced onions and garlic. The oil keeps the dough moist and rich, and the onions and garlic turn sweet and wonderful in the high heat, needing only a sprinkle of salt to round everything out. While I do make the dough from scratch on occasion (and, in a particularly industrious phase, even kept a sourdough starter going for months at a time, from which I made weekly batches of baguettes or focaccia), lately I've had neither the time nor the energy to make my own, so I procure the dough from the neighborhood pizzerias or from the refrigerator case at Trader Joe's. If you have the time and inclination, I highly recommend Alton's recipe, which, if not fast, is practically foolproof and incredibly flavorful.

Pizza Bianca with Red Onion and Garlic
Makes 2 oblong pizzas, approximately 12 inches by 6 inches

1/2 lb pizza dough, purchased from your friendly neighborhood pizzeria
1 large red onion, thinly sliced
6 cloves garlic, thinly slices
1/4 cup good olive oil
Salt and pepper to taste

Equipment:
A baking stone or unglazed quarry tiles
A pizza peel or cookie sheet (turned upside-down if it has a rim), for transferring the pizzas to and from the oven
Coarsely ground cornmeal for dusting the peel or cookie sheet

Move the oven rack to lower third of the oven and position the baking stone on the rack. Preheat the oven at 550 F for at least 20 minutes, to allow the stone to get really hot.

Meanwhile, mix the topping ingredients in a bowl and allow to marinate. Divide the dough into two equal portions and shape into balls, cover with plastic wrap, and allow to rest until the oven is ready.

When the oven and the stone are blistering hot, sprinkle the peel or upside-down cookie sheet generously with the cornmeal, to prevent the dough from sticking when you transfer it to the oven. Stretch out the first ball of dough into a long, thin rectangle, approximately a foot long and six inches wide, by pressing, pinching, and even letting it hang down from your fingertips to let gravity do the work. (If the dough immediately shrinks back, cover with plastic again and let it relax for several minutes before trying again.) The thinner you get it at this point, the crispier the end product will be, but don't worry about the precise thickness. If the dough tears, just pinch it back together.

When the dough is thin enough for your liking, lay it onto the cornmeal-dusted peel or sheet, and spread with half the topping mixture, making sure to leave a lip of at least half an inch all around to prevent the toppings from sliding off during the transfer. Gently shake the peel or sheet to be sure the pizza isn't sticking, and then slide the pizzas off the peel/sheet onto the heated stone in the oven with a few quick jerks.

Bake for 10 minutes, or until the dough is a dark golden brown and the onions and garlic are beginning to caramelize, then remove to a cooling rack for a few minutes before eating.

Repeat with the remaining half of the dough and topping mixture.

Notes: If you must have cheese, I'd suggest doing what we did with this batch: Add paper-thin slivers or a fine grating of cheese at the absolute last minute, after the pizza is already out of the oven. (We used Manchego, which was lovely.) If you want the cheese to brown, don't put it on the pizzas before they go in the oven; add it in the last few minutes of baking, once the dough has already set and is starting to turn golden. This will ensure that the crust stays crisp and the cheese doesn't burn or turn oily.

Sunday, June 18, 2006

Sunday Night Sweets Blogging: Opera Cupcakes


We're woefully overdue for another Sunday night sweets entry. It isn't that I haven't been baking; it's just that life has been interfering with blogging time again. The hazelnut chocolate chip cookies I made two weeks ago were a bit disappointing and not worth posting about yet, but I'll try to find time to write up last week's almond-caramel sandwich cookies sometime soon, since they came out rather well.

In the meantime, tonight's mood was in the cake direction. The foibles of my crappy oven aside, I've been really happy since I started using Shirley Corriher's recipe for Basic Moist Sweet Cake from Cookwise for cupcakes. The method is a bit quirky, since you blend the flour and the fat together first, then add the liquid ingredients, but the end product is wonderfully moist, tender, and velvety. I think it might actually work better as cupcakes, since the crumb is so delicate and melting that I can't imagine it holding up particularly well to frosting or slicing as a full-sized cake. As it is, you really need to double-line the muffin cups, or use the stiff mini-panettone molds I used this time, to give the cakes enough support to stand up once you unmold them; otherwise, they just spread and deform in the liners.

Besides the fantastic texture, the other advantage of this recipe is that you can use any oil you like, but nut oils, if you have them, give you an incredibly flavorful end product. Nearly every time I've made this recipe, I've used macadamia oil, which gives the basic yellow cake a wonderfully exotic, round, full flavor. This time, since I'm out of the macadamia, I used hazelnut, which inspired me to go with the coffee-chocolate combination of the classic Opera Cake when it came time to frost. Having both a coffee buttercream and a ganache glaze is probably overkill for cupcakes, but I couldn't decide on one or the other, and I really do love the combination of chocolate, coffee, and nuts.

I'm not entirely happy with the decoration here, because the coffee beans are too small and too dark to make any impact against the ganache. Next time I'd probably use the half-cup of leftover buttercream to pipe rosettes on top of the ganache and then top with the coffee bean, or perhaps a chocolate-covered espresso bean. I'm not going to knock myself out over aesthetics this late on a Sunday, though, and anyway, you really can't argue with the taste.

Opera Cupcakes
Makes 20-24 cupcakes

Hazelnut Cakes
2 large eggs
3 large egg yolks
6 tablespoons plus 2 tablespoons buttermilk (1/2 cup total)
1 teaspoon vanilla extract
1 1/2 cups cake flour
1 1/3 cups granulated sugar
1 1/2 teaspoons baking powder
1/2 teaspoon salt
1/4 pound (1 stick) unsalted butter
1/3 cup hazelnut oil (or other nut oil, or mild vegetable oil)

Leave eggs, buttermilk and butter out at room temperature until butter has softened.

Place shelf in lower third of oven, and preheat to 350. Set 20 mini panettone molds on a baking sheet, or line two muffin trays with liners.

Sir the eggs, yolks, 6 tablespoons buttermilk and vanilla together in a liquid measuring cup.

In the bowl of a standing mixer, combine the flour, sugar, baking powder and salt, and mix on low speed for 30 seconds. Add the butter, oil and remaining 2 tablespoons butermilk, and mix on low until the dry ingredients are moistened. Increase to medium and beat for 1 1/2 minutes, until light. Add the liquid ingredients, one third at a time, beating for 20 seconds between additions.

Fill the molds or muffin cups halfway and bake until golden and a tester comes out clean,
approximately 20-25 minutes. Remove from oven and let sit on baking sheet or in muffin trays for ten minutes before removing to a cooling rack to cool completely.

Coffee Buttercream
3 cups powdered sugar
1 cup (2 sticks) butter
1 teaspoon vanilla extract
2 tablespoons instant espresso powder, dissolved in 1/4 cup hot water
1 to 2 tablespoons whipping cream

In a standing mixer, mix the sugar and butter on low speed until well blended, then increase speed to medium and beat for another 3 minutes, until light and fluffy.

Add vanilla, dissolved espresso and cream and continue to beat on medium speed for 1 minute more, adding more cream if needed for spreading consistency.

Once the cupcakes have completely cooled, spread 2-3 tablespoons of buttercream over the cakes, creating as smooth and level a surface as possible and leaving at least 1/4 inch of space between the buttercream and the top of the mold/liner for the ganache layer. Refrigerate the frosted cupcakes in an airtight container until the buttercream has firmed.

Ganache
150 grams heavy cream
150 grams dark chocolate, chopped fine
2 tablespoons Lyle's Golden Syrup (or corn syrup)

Heat the cream in a liquid measuring cup in a microwave until near boiling, approximately 1-2 minutes. Add the chocolate and whisk thoroughly, until chocolate has dissolved and the mixture is smooth. Whisk in the syrup.

Pour 1-2 tablespoons of the ganache over the frosted cupcakes, tilting the cupcakes to swirl the ganache over the surface and ensure even coverage of the buttercream layer. (Do not touch the ganache or try to spread it with a spatula or other utensil, as it will mar the shiny surface of the end product.) If desired, add a coffee bean or chocolate covered espresso bean as garnish.

Return to the refrigerator in a covered container until the ganache has set.